|
|
|
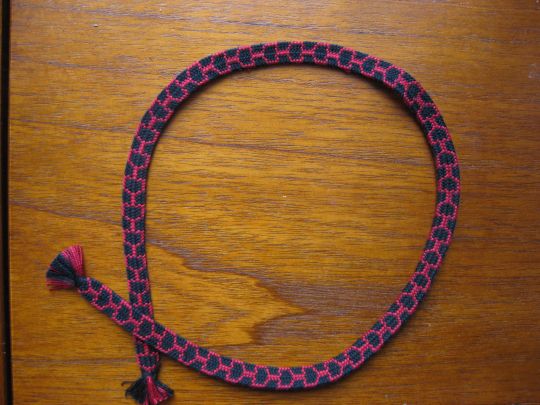
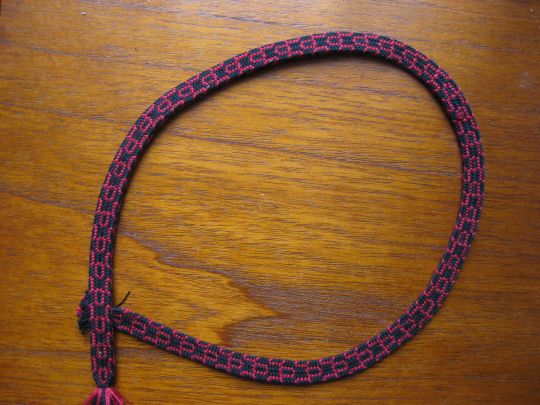
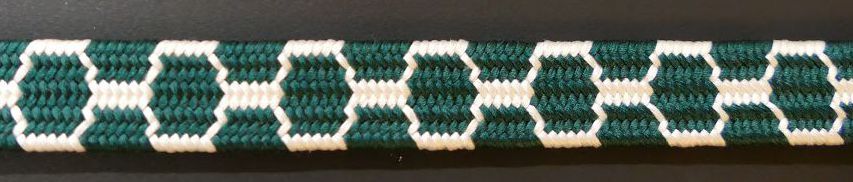
This is a braided silk cord. The braiding technique is called kumihimo in Japanese. Kumi meaning gather, and himo meaning string or cord. The specific pattern is a very old Japanese pattern called kikko or tortoise shell because hexagonal pattern formed by the contrasting colors resembles the hexagonal pattern on a tortoise shell. That pattern symbolizes long life. [1] The kikko braided pattern shown below dates to the Heian Period 794-1192 CE.
|
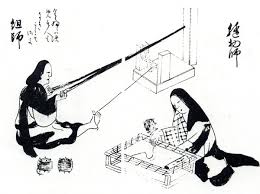
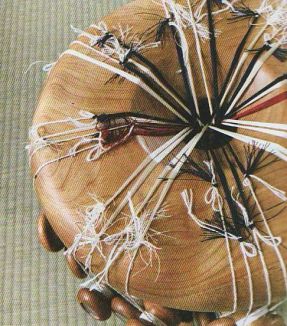
Kumihimo is a fiber art in Japan that can be documented as far back as the Jomon Period, 800-400 BCE. [3] Pottery from this period shows impressions of braided cords on the outside. The actual cords from that period no longer exist. Originally, the braids were made using baste fibers such as hemp or ramie, because that was available. There are examples of braids used as decorative cords on clothes, as wrappings for scrolls, and later on armor throughout history to modern times. The braiding technique may have been imported from China or Korea. The earliest form of braiding was hand-loop manipulation, or kute-uchi. In the picture below, the person holding the strings is braiding using that technique. When you braid this way you need to pull the threads tight after you exchange them. You see a ashiuchidai beater stand in the picture. The beater is attached with a cord tied to the ankle and mounted on the stand. It allows the braider to make a long braid and tighten it with the beater after exchanging the threads.
|
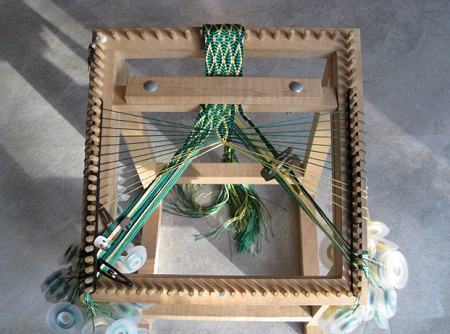
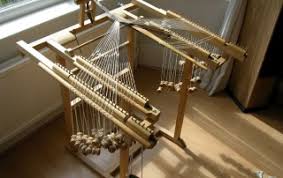
In the Heian period two different types of braids became important. There were very wide sashes of silk worn my the emperor and high ranking officials. They were probably braided on a karakumidai. The top picture below shows a wide braid on the karakumidai. This type of braiding stand dates to the Heian period. There were also scroll ties that have been found at various shrines. These were probably hand-loop braided. Hand-loop braiding is done by one or more individuals. Some of the cords have 56 separate strands. There is another with 172 thread bundles. Silk was introduced to Japan sometime on or before the Nara period of around 700. Silk became the fiber of choice for braiding. Silk kumihimo cords replaced leather cords for armor lacing, for the ties of the armor, the sword belt, the wrapping on the sword handle and scabbard, as well as for the cords for the armor for the horses.
|
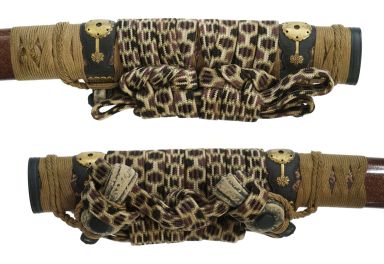
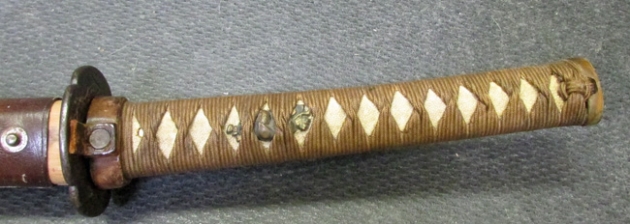
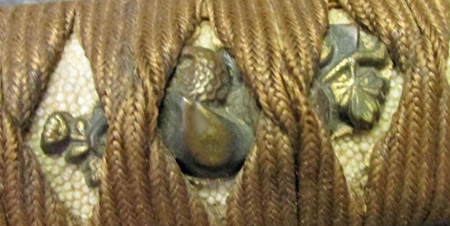
The kikko pattern became a popular pattern that Samurai used for the waist belt on the armor that attaches the sword. Kumihimo cords were also used to wrap the handle of the sword. In addition to the symbolic long life, there were more practical benefits. Silk is very strong. There is a technique of putting the braid in iced water for 24 hours to tighten them and make them stronger. The wrapping on the sword handle made the sword easier to grip because of the texture of the braid. There was also a technique of twisting the braid as it was wrapped on the hilt to make it easier to hold. See the pictures below of a 16th century sword with wrapped handle. There is also a very detailed photo of the segeo cord wrapped around the scabbard of a sword. You can see clearly the kikko pattern. This is a four color example. This particular braid was probably braided on a takadai. The cord is in very good condition and is probably not as old as the sword. This sword has been authenticated and dates to sometime between 1492 and 1569.
|
|
|
In the Heian period, the kikko braid was probably braided using hand-loop braiding. However, because the braid has at least 32 strands, it was probably braided by two or more people. The pattern has also been braided using a takadai, which dates to the 16th century. There is a takadai kikko braid pattern that has 56 strands. The kikko braid pattern has been adapted for marudai, but that is more recent. Because I am most familiar with the marudai, I used that adapted pattern. The marudai stand that we know today was used starting very late 1500s or early 1600s. There are older stands with a similar shape used earlier as well as similar stands from China and Korea that were used earlier. [3]
There are often several ways to create a braid pattern, and the braids can usually be done using different techniques, braiding stands, and may have a different number of strands that are braided. The patterns are not the same structurally. For example, some of the braids on the takadai have the kikko pattern on both sides. The hexagon is also a slightly different shape. The pattern that I use has a different pattern on the back of the braid, than on the front. Also the hexagon in my braid is an odd shape.
|
|
|
One difficulty with the kumihimo patterns and braiding techniques is that the masters of these arts guarded their knowledge and did not document the patterns or techniques. The braids that were braided in Buddhist shrines were braided as a form of meditation. That knowledge was also not shared or documented. Even today that mind-set continues in braiding schools and in other specialized crafts.
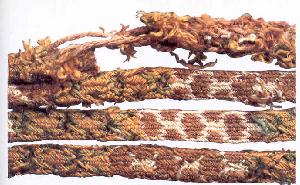
It can be misleading to study museum pieces from in Japan as well to determine the appearance or structure of a traditional braid. The people who have analyzed museum armor from Japan have noted that as braids deteriorated they been replaced and the replacements are not necessarily the same patterns or structure as the original. They found that on the armor from the Victory and Albert museum in London, that although the braids were in poorer condition, they are older braids and may have been the original braids that for the armor.
When the samurai adopted kumihimo for the lacing and decorative cords sometime in the Muromachi period, 1333-1573, the braid would have been braided with reeled silk threads that had been dyed. Reeled silk is available from Japan today in dyed pre-measured and bundled packets. The braids from that time were either braided using the hand-loop braiding technique I showed earlier or using a takadai, shown below.
|
Because this is a learning exercise, I used 5 threads of 2/30 silk weaving yarn instead of reeled silk. As a result, my braid is not as smooth and does not have the same sheen as one from reeled silk. Compare my braid of twisted silk yard on the top to the braid from reeled silk below. Based on the shape of the hexagons and the number of threads in the braid, I would guess the green and white cord was braided on a takadai.

|
|
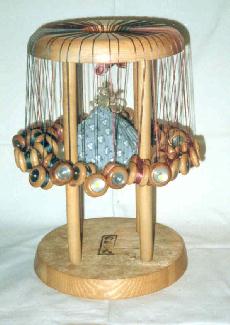
I used two warping pegs to string the yarn back and forth. I wrapped all the threads on the warping pegs, then tied the one end securely and cut the other end. Next, I attached five threads each to a leader cord on the bobbins, tama. The leader cord is cotton string about 30 inches long that is tied in a loop, and attached to the tama with a lark's head knot. The other end of the leader cord is attached to the end of the braiding material. The extra length of the leader cord allows you to braid to the end of your material and still have enough cord so the tama still hang down a little from the top of the marudai. The tama need to hang down a few inches from the top of the marudai so you can easily move the threads and place them.
|
Tama have a weighted core. The tama can have various weights depending on whether you are braiding on the marudai, or the takadai, or the kakudai. They also vary depending on the number of bundles of thread you are braiding, and on the number of threads, and the material. This braid requires 32 tama and I only had 32 of the same size and weight in 85g tama. So that is what I used. In addition to the tama, you need a bag of counter weights that total roughly 40% of the total weight of the tama. It attaches to the braid and pulls the braid down through the center of the marudai.
|
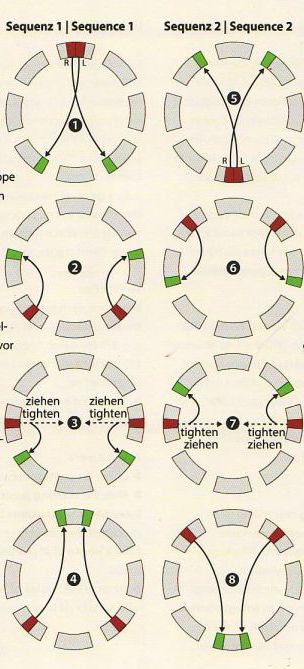
The pattern that I used is a pretty simple set of moves. There are only 8 steps total, but the second 4 steps are just a horizontal mirror of the first 4 steps. See the picture below. What is complex, is that there are 32 strands. You need to be very careful that you place the strand in the correct location, and then pick up the correct next thread. I tore the braid out completely six times I first started braiding the pattern. It took a little time to get the pattern down, but I did finally figure it out. There are no mistakes in the pattern, but there is a knot in the yarn.
|
There were four tips that I needed to do to correctly braid it. First, I could not braid when I was tired or late in the day. Second, I would only braid a single round at a sitting. A round is the number of steps it takes to get back to the starting position. The thread pattern is complex and doesn't repeat for 32 sets of 8 moves. However, the particular color setup that I used is symmetric across the vertical axis. That simplified things so my threads looked like my starting position after just 16 rounds of 8 moves, but technically the tama weren't in the exact same starting position. Third, was I had to carefully tidy up the threads after 4 moves, so it was easier to keep track of which strand was which. The pattern has the threads arranged around the marudai in sets of 4. So keeping those sets separated without mixing up the threads within the set is important. The last tip was coming up with a chant or mantra that would help me remember where I am in the pattern and what I just did.
I refer to this braid as an experiment or exercise because I have not previously braided a 32 strand braid. I have braided a few 24 strand braids, but I prefer to stick with 16 strand braids. However, the lure of the kikko pattern and the simple sequence of moves was enough of an incentive for me to attempt the braid.
There is a book that was recently published by Claudia Wollny called "The Secrets of Kikko" that show 85 distinct patterns for 32 strand kikko on the marudai. I used this book as my reference for how to do the braid, for picking the specific two color setup that would create a the traditional kikko pattern. The sequence of moves shown above is from that book.
[1] Carey, Jacqui. Samurai Undressed. Published by Carey Company, 1995.
[2] Japanese Kumihimo, the Art of Silk Braiding Japanese Kumihimo, the Art of Silk Braiding
[3] Owen, Rodrick. Braids 250 Patterns from Japan, Peru & Beyond. London, Cassell Ilustrated a division of Octopus Publishing Group Limited, 1995.
[4] Newsletter #6 by the Loop Manipulation Braiding Research & Information Center Newsletter #6 by the Loop Manipulation Braiding Research & Information Center
[5] Braiding Experiments: AKA Lessons Learned in Japanese Braiding Braiding Experiments: AKA Lessons Learned in Japanese Braiding
[6] Detailed example of kikko pattern segeo cord wrapped sword Detailed example of kikko pattern segeo cord wrapped sword
[7] Example of handle wrapping of an antique samurai sword Example of handle wrapping of an antique samurai sword
[8] Jenny Parry's website Jenny Parry's website
[9] Nishioka Samurai's Armer & Braiding Studio. Tachibana Museum, curated by Nishioka Chizuru and Ueno Kaori Nishioka Samurai's Armer & Braiding Studio. Tachibana Museum, curated by Nishioka Chizuru and Ueno Kaori
[10] Wollny, Claudia. The Secrets of Kikko. Claudia Wollny Edition, 2020. Wollny, Claudia. The Secrets of Kikko. Claudia Wollny Edition, 2020.